
Source Controlled Epicor Customization Development with GitHub & Visual Studio Code
Overview
A recently released extension for Visual Studio and Visual Studio Code tremendously enhances the customization development experience for Epicor. A shortlist of the benefits from this extension includes:
Actual source code control (no more naming policies on customizations as a method of controlling versions)
Code completion
Linting/code formatting
More rapid development with a highly productive interface
This document describes the setup and usage of this extension, along with a working new set of best practices for developers.
Setting Up GitHub for Epicor Source Control
Repository Setup
First off, you are going to want to sign up for a GitHub team account here:
While you could start off with a free account, given the rather insignificant cost as compared to benefit I recommend you get started from the get-go with a team account. I recommend that you set up as an organization with a name based on your company, something like ‘your-company-name.’
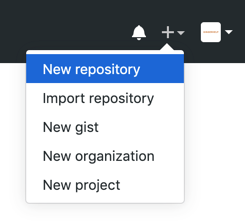
Upon setting up your organization, you will then want to create a new repository:
Give the repository a name (I’d recommend something like ‘epicor-customizations’), select the box to make it a private repository, and click ‘Create Repository’.

Now we want to initialize the repository with the files to get you started off the right way. There was an option in GitHub that would have initialized the repository with a README file, but I am suggesting a slightly more manual approach here to give us started on the right foot. Before you can do anything, though, you will want to install the GitHub client on your computer from here:
When you have downloaded and installed this client, verify the install was correct by pulling up a command prompt and typing ‘git’. If you get a bunch of output telling you how to use the Git command line you are good to go.
Now let’s create a folder on our C: drive to hold source code.
mkdir c:\src\epicor-customizationscd \src\epicor-customizations
Next we will create a few files to start off with in this directory - just copy and paste all of this text into the command window:
echo "Here is a great place to document things about your customizations" >> README.md(echo # ignore the files we don't want to clutter up GitHub commits withecho *.cache)>".gitignore"
Now initialize our repository with these new files - same as before, just paste all of this into the command window:
git initgit add README.mdGit add .gitignoregit commit -m "first commit"git remote add origin https://github.com/YOUR_ORGANIZATION_NAME/YOUR_REPOSITORY_NAME.gitgit push -u origin master
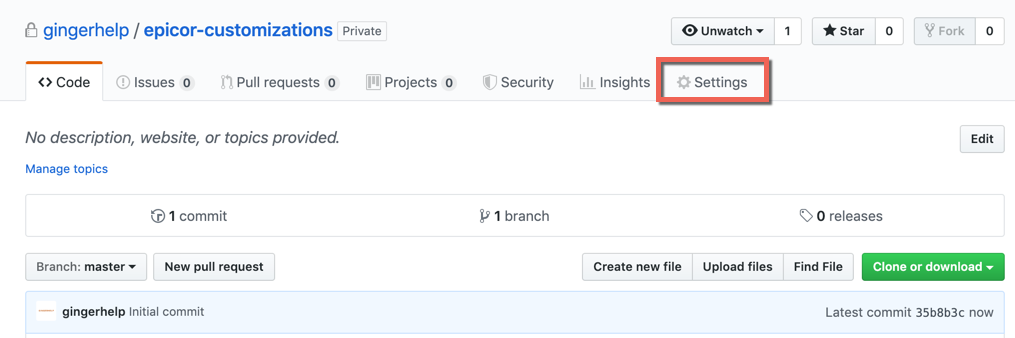
Now that the repository is set up you will want to add your users. Do so under ‘Settings’:
Then fill them in under ‘Collaborators’:

You can either fill them in as regular ‘Collaborators’ along the bottom or if you want a bit more granular control you can create teams that can be designated to have read / write / admin and various other levels of control.
Brief Concepts
GitHub is an incredibly powerful platform, and how you use it will depend on how dynamic your development team structure is. Most folks will want to start simple and just know that it can become vastly more complex and powerful. Here are a few concepts to be aware of:
When we initialized this repository, we added a README.md file with a hint that it is a good place to document your project. These files are written with a syntax called markdown and is documented here: https://guides.github.com/features/mastering-markdown/ You can have as many of these files as you like, interlinking with each other. They can be a great place to document things like your development standards.
Under the issues tab, you can document all of the issues (bugs, enhancement requests, etc.) for a given repository, track the conversations regarding those issues, and cross-reference code commits to them to more easily understand WHY something was changed.
Repositories can be broken up into branches (i.e., master, development, etc.) that can have different permissions. Most customers will want to start simple where all commits just go against master (the default branch created), but more elaborate configurations may have only a select few maintainers having permission to accept code into master. Please just note before you read the rest of this - you do not have to do this - it is just written out here so you can understand how more complex projects are set up. Under this configuration developers would typically create their own branch by simply typing a name for it in this box:

Usually, the branch name would be very clearly referencing the thing they are working on (i.e., Lot Tracking Enhancements), and the user would change to that branch within their Visual Studio Code application. All commits go to this branch until they are ready to submit it for approval. When they are ready they will notice GitHub has added this button to easily create a pull request:

A pull request gathers all of the files that changed in the branch, figures out how they merge back in, and gives the submitter an opportunity to provide some narrative in the form of comments. The privileged maintainer of the branch they wish to merge into will receive a notification and be given an opportunity to accept or reject this pull request.
Developer Setup
Git
NOTE: There is a bit of rehash here from the documentation setting up the repository with the assumption that developers might skip straight to this section.
First you will want to download and install the Git client from https://git-scm.com/downloads. Upon installation you will know it is configured correctly if you open up a command line, type ‘git’ and see a bunch of output on how to use the command. From here, you will want to create a folder to store your Epicor customization code (for all customizations) and point it to the GitHub repository that has been set up by your company (see Setting Up GitHub for Epicor Source Control). Assuming you want the code in c:\src\epicor-customizations, execute the following from the command line:
mkdir c:\src\epicor-customizationscd \src\git clone https://github.com/YOUR_ORGANIZATION_NAME/YOUR_REPOSITORY_NAME.git epicor-customizations
Visual Studio
This document is geared towards the usage of Visual Studio Code (VS Code) as opposed to the full version of Visual Studio (VS). There are fewer licensing implications for VS Code (fully free under all use scenarios) versus VS (free only with 5 or fewer developers), it is faster due to the lighter footprint, and for how this extension works is no less tightly integrated. The only difference that may initially be perceived as a downside but will likely later be appreciated is that the VS Code extension optimizes its initial menu for keyboard shortcuts whereas the VS extension has a graphical initial menu.
To install, start off by downloading Visual Studio Code from here:
https://code.visualstudio.com/
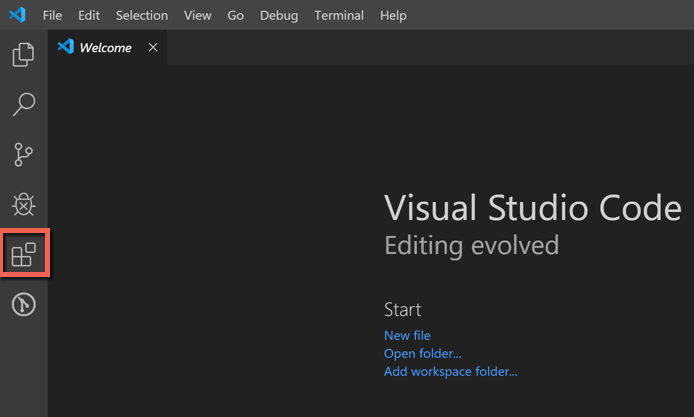
When the installation is complete, launch the program and click on the extensions button along the left hand side:
Here you will see a list of recommended extensions (many of which you may want to play around with after initial setup) but here is the list that I recommend to get started:
C#
Epicor Customization Editor
GitLens
Open Folder Context Menu for VS Code
Install each of these extensions by selecting them from the list and clicking their respective ‘Install’ links in the content area:

Next we will want to configure the Epicor extension. To to so, go to File / Preferences / Settings:

Then within the body of the window search for ‘epicor’ in the search box - we need to fill in those first 3 boxes:

Epicor Client Folder - as you might expect, this will be the Epicor client folder location.
Customization Folder - this is the folder we created and synced to GitHub in the previous section.
DNSspy Location: this is an optional step but is recommended as it allows you to debug Epicor code in the integrated development environment. Download the latest .Net release from https://github.com/0xd4d/dnSpy/releases, unzip the file to the location of your choice, and point to the folder here.
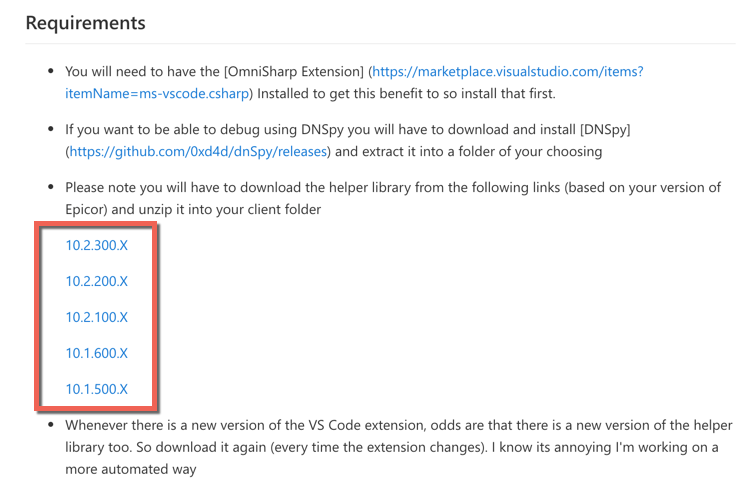
The last step here is to download a necessary helper library from https://marketplace.visualstudio.com/items?itemName=josecgomez.epicor-editor. If you scroll down to requirements you will need to download the appropriate helper library for your release:
This will download a ZIP file that you need to extract into your Epicor client folder. When you download the file you MAY need to go to it’s properties and ‘unblock’ it if Windows has decided it doesn’t want you downloading DLL / EXE files. Once you have ensured it isn’t blocked, simply extract the file and move onto the next steps.
Usage
Under the file menu, select Open Folder and select the folder when you selected to store your Epicor customizations (in our example c:\src\epicor-customizations). Upon opening only a few items will be present unless others have already committed customizations to the repository:

In order to add a customization so that you can begin working with it, load the command pallet using the hotkey Ctl + Shift + P (if you forget, it is under the View menu). This will bring up the command pallet where you can type ‘epicor’ and see all of the relevant commands:
There are 4 basic commands to be aware of you can run here:
OPEN: This is what you will use when you want to first pull in a customization into VS Code.
SYNC UP: After you make any code changes this command is used to push them back into Epicor. Note that logic is baked into this command to detect if the customization has been changed since initial download within Epicor directly so that you don’t inadvertently overwrite somebody's work.
DOWNLOAD: This command grabs the latest version of the customization from Epicor and uploads the local source code accordingly.
TOOLBOX: This screen allows you to edit the customization UX using the Epicor customization editor, run (and debug) you local code, and have quick access to a variety of tools within Epicor from a convenient menu.
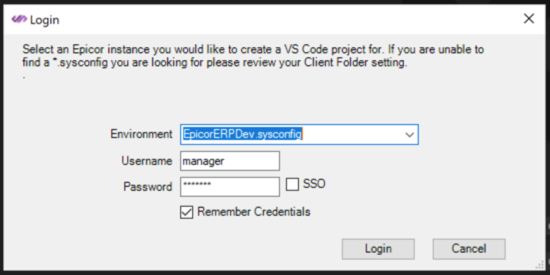
So our first step unless the customization you are working with is already listed is to run OPEN. Doing so will first ask you which environment and credentials you wish to use to connect:
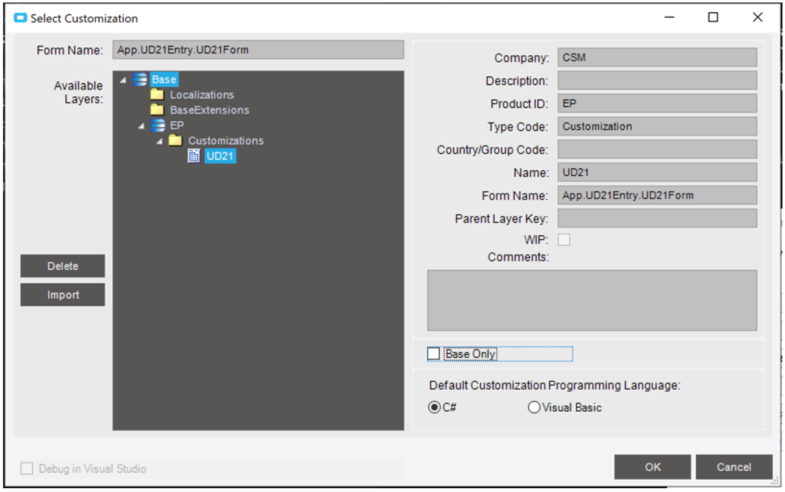
Then it will connect to Epicor and bring up the Customization Maintenance search screen where you can locate the customization you will be working on the same way you would within Epicor:

After hitting OK you will see a folder added to your project window and it will automatically drill you into the newly created subfolder. The downloaded project will have a structure similar to the following:

The two files highlighted in green here (this is due to the .gitignore configuration suggested in “Setting Up GitHub for Epicor Source Control”) are the files you should focus on:
The XML file is an exported version of the customization you just selected. This file serves two purposes - for one it is a solid backup we can always roll back to as needed. We will get this under source control for easy “worst case” rollbacks.
Script.cs is an equivalent of exactly what you see in Epicor for the code on a customization. Only now that we are in VS Code we have the benefit of code completion, linting, etc.
So let’s start with a simple code-only customization here. We are going to add a simple “Hello World” message box on initialize. So open up Script.cs and add the text as shown for line 39 (notice all the great code completion and hints as you type):
Now save your code and let’s run it by hitting Ctrl + Ship + P and selecting TOOLBOX:

On this window you can select either the ‘Debug’ or ‘Edit/Run’ button to test out your code - it will have automatically synced up the code changes into Epicor. If you select ‘Debug’ DNSpy will also be loaded and pointed to the running screen so that you can step through the code. Edit / Run skips the DNSpy step (and in turn is a little faster). Select Edit / Run for this example and you will be presented with some warnings to make absolutely certain you know that you should not be making changes to the code in VS Code while you are in this screen - acknowledge them to continue:
From here you will see the familiar Epicor customization selector where you should pick the customization you are running here:
Because of the code we did here, you will actually see a “hello world” pop up you must click before the rest of the screen shows:

Note that within this customization presented on screen you can go into customization mode and do whatever tweaks you need here as well and it will automatically sync back to the VS Code project. Also note that it is at this point that if somebody directly modified this customization within Epicor more recently than you used the OPEN command to pull it into VS Code you will get a message notifying you as such and asking if you wish to overwrite it.
After you close the customization you will again see “hello world” as the extension needs to run the customization in order to export out the XML file and you are finally returned to the code editor.
After a customization has been successfully tested and is ready to commit you can do so using the source control tools along the left hand side:

So here I can see I have to files changed (that we are tracking) and I can press the + button next to each of them to make them part of a commit. You should fill in a message in the box where it says message (note, if GitHub issues are in use refer to them here prefixed with the ‘#’ symbol) and then press the checkbox in the upper right of the screenshot. Your code is now staged for a commit, to make it formal use the button along the bottom of the screen:

Customization Naming Standards
So it was mentioned in the introduction that we no longer need to rely on customization naming as our versioning logic for Epicor. It is better to keep common, consistent names so that the full history of code changes are documented within GitHub. A naming scheme should have the following primary objectives:
The commit history for a customization should remain intact (changing customization names can cause a problem here).
The loss of work due to customization overwrites should be made nearly impossible.
Developers should not have to perform an undue amount of work to publish a version of code that includes enhancements made by others.
Testers should not have to jump through unreasonable hoops to test their work but should also be shielded from “in progress” work.
So to that end, the recommendation would be that all screens to be customized have three customizations against them - one named exactly the same as the screen itself (i.e. JobEntry), another named as the screen and suffixed with a “_Dev” (i.e. JobEntry_Dev) and the final having a “_Test” suffix (i.e. JobEntry_Test). All developers will work against the “_Dev” customization and it will be that customization that will hold all source commit history for the screen. When a “_Dev” customization is stable and ready to be tested it will overwrite the “_Test” version which will have a special testing menu for the testers to access. Upon tester approval the “_Test” customization will overwrite the version without any prefix.
Under the scenario developer conflicts will certainly occur and mindful use of both source control and frequent syncs will prevent any loss of work. In the case where a developer encounters the message regarding a newer customization present that will be their trigger to perform the simple steps to merge:
Commit the current code to GitHub assuming it is of committable quality.
If it is not to that stage currently the developer can create a branch and commit to that instead.
Use the download function to allow the other developers code to get pulled in.
Compare the differences using to what is committed in GitHub to perform an effective merge.
I am very open to feedback on alternate approaches here, but hopefully this helps get you started!
