
Accessing / Updating Fields The Right Way Using Epicor EpiViews
The EpiView provides an elegant solution to a challenge that becomes increasingly difficult with complex screens. Take, for example, sales order entry - you have a header, lines, and releases all with fields you might wish to utilize in your code. Without EpiViews, you might look for key values directly from the screen widgets (i.e. pull the sales order number from the text box on the main screen and then the line/release from their respective combo boxes on the releases tab). This becomes dramatically more complex as you are interacting with different kinds of widgets (am I pulling the ‘Text,’ ‘Value,’ ‘ActiveCell,’ etc.) or when the relationships between parent and child records are more complex than a single key (like sales order number). And then what if you want to edit one of those values while preserving all of the business rules built into Epicor? In short, it would make a real mess.
Enter EpiViews. Epicor EpiViews are a layer provided within customizations that wrap around the tables or objects that make up a screen, defining how they relate to each other and giving you an interface to properly interact with them. Going back to sales order entry, here is an example of all of the EpiViews present:

EpiViews showing from Tools / Data Tools menu.
This is a prime example where we have some views that you will recognize as regular tables (i.e. OrderHed, OrderDtl) and many that you will not recognize because they are objects within the screen that have been created via code. Your first usage of these EpiViews will likely have come from editing the screen widgets where you may have noticed the EpiBinding:

So here we see that the PO field on the sales order header is bound to the EpiView ‘OrderHed’ and the field within that EpiView called ‘PONum’. And as you will have likely observed in working with these bindings, they have a ton of baked-in intelligence. For example, you cannot edit the PO number on a voided sales order, the field automatically clears out when you hit the clear button, and it automatically updates when you load an alternate sales order. What’s more, if you are dealing with child EpiViews (i.e. OrderDtl and OrderRel) they are aware of what parent record is selected and are presented accordingly. All of this isn’t limited to just EpiBindings - you can also have access to EpiViews within the script editor with all of the same functionality. To have Epicor write all of the boilerplate code for you, go to Wizards / Form Event Wizard, select EpiViewNotification, and pick the table / object portion of what you are interested in working with (i.e. ‘OrderHed’):

Now press the add arrow and press the ‘Update Selected Event Code’ button:
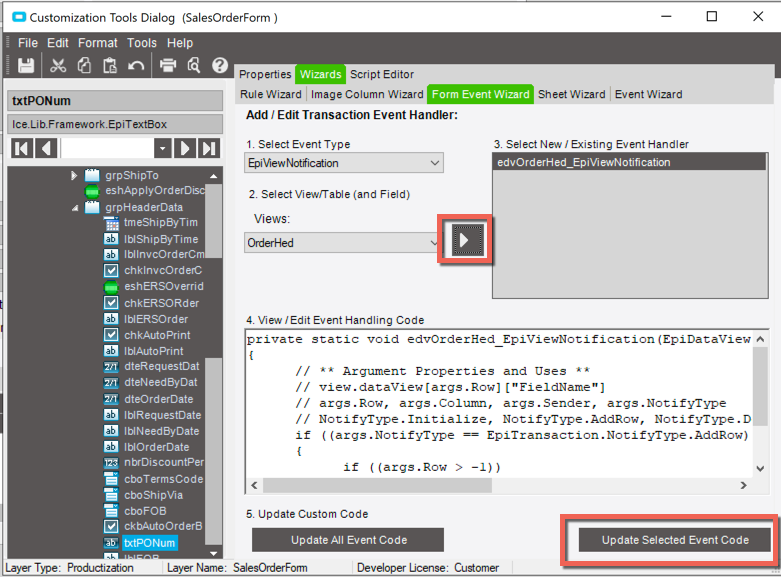
Now head over to the Script Editor to see what it wrote for us. You could have written all of this code by hand if you liked and there are definitely times I will do that if I want to throw a custom table onto a screen, but if working with a standard EpiView work smarter not harder. Pulling out the comments to keep this more brief, here is how the contents class Script will look now:
    private static EpiDataView edvOrderHed;

    public static void InitializeCustomCode()
    {
        Script.edvOrderHed = ((EpiDataView)(Script.oTrans.EpiDataViews["OrderHed"]));
        Script.edvOrderHed.EpiViewNotification += new EpiViewNotification(Script.edvOrderHed_EpiViewNotification);
    }

    public static void DestroyCustomCode()
    {
        Script.edvOrderHed.EpiViewNotification -= new EpiViewNotification(Script.edvOrderHed_EpiViewNotification);
        Script.edvOrderHed = null;
    }

    private static void edvOrderHed_EpiViewNotification(EpiDataView view, EpiNotifyArgs args)
    {
        if ((args.NotifyType == EpiTransaction.NotifyType.AddRow))
        {
            if ((args.Row > -1))


    }
Breaking this down, the first line is defining an object for the EpiDataView:
private static EpiDataView edvOrderHed;
Then within InitializeCustomCode it is wired up to the EpiView of interest AND an event handler is registered to a function named edvOrderHed_EpiViewNotification that you can use to monitor changes (note that this second line could be omitted entirely if you don’t want it, but I usually leave it):
    public static void InitializeCustomCode()
    {
        Script.edvOrderHed = ((EpiDataView)(Script.oTrans.EpiDataViews["OrderHed"]));
        Script.edvOrderHed.EpiViewNotification += new EpiViewNotification(Script.edvOrderHed_EpiViewNotification);
    }
DestroyCustom code sets the EpiDataView to null to prevent a memory leak and de-registers that event handler. As with the previous section, that line isn’t required if you don’t need it:
    public static void DestroyCustomCode()
    {
        Script.edvOrderHed.EpiViewNotification -= new EpiViewNotification(Script.edvOrderHed_EpiViewNotification);
        Script.edvOrderHed = null;
    }
Then lastly we have the function for that event handler, if you wanted to use it, that will trigger an event any time that anything changes in the EpiView:
    private static void edvOrderHed_EpiViewNotification(EpiDataView view, EpiNotifyArgs args)
    {
        if ((args.NotifyType == EpiTransaction.NotifyType.AddRow))
        {
            if ((args.Row > -1))


    }
Alright, so with all of this in mind here is all that you really need to know - with this boilerplate in place you can now use the following code pattern to get data out of any of the fields within this EpiView:
edvOrderHed.dataView[edvOrderHed.Row]["PONum"]
Before the first dot you have the EpiView name, then we are accessing the dataView property at an index of edvOrderHed.Row - that is giving you the currently selected record. The last bit is the actual field name you want to work with. And with this same reference you can just as easily set the value of that field:
edvOrderHed.dataView[edvOrderHed.Row]["PONum"] = "hello";
With all of the benefits you’d have working with EpiBindings - Epicor is going to prevent editing a field if it is disallowed for some reason, it will enforce data validations, etc.
I mentioned earlier that you can actually creating your own EpiViews as well - there is a little more boilerplate to this technique but it is an incredible tool. You start in the same way by adding the EpiDataView reference up at the top of the script:
EpiDataView edvPartPricing;
Then within your InitializeCustomCode (or more likely in a separate function to keep things cleaner) you can define your table structure AND how it ties to an EpiView:
        dtPriceDetailByPart = new DataTable();
        dtPriceDetailByPart.Columns.Add("ProdCode", typeof(string)).ExtendedProperties["Enabled"] = false;
        dtPriceDetailByPart.Columns["ProdCode"].ExtendedProperties.Add("Like", "ProdGrup.ProdCode");
        dtPriceDetailByPart.Columns.Add("PartNum", typeof(string)).ExtendedProperties["Enabled"] = false;
        dtPriceDetailByPart.Columns["PartNum"].ExtendedProperties.Add("Like", "Part.PartNum");
        dtPriceDetailByPart.Columns.Add("Price", typeof(Decimal)).ExtendedProperties["Enabled"] = false;
        edvPartPricing = new EpiDataView();
        edvPartPricing.dataView = new DataView(dtPriceDetailByPart);
        oTrans.Add("PriceDetailByPart", edvPartPricing);
        parentKeyFields = new string[1];
        childKeyFields = new string[1];
        parentKeyFields[0] = "ProdCode";
        childKeyFields[0] = "ProdCode";
        edvPartPricing.SetParentView(edvOrderDtl, parentKeyFields, childKeyFields);
So here we have a new table structure that has a column for ProdCode and we tie that to another EpiView for OrderDtl using that field. Later on we can fill that data table perhaps from a BAQ and it will automatically show the correct rows for a given ProdCode.
