
Logging Epicor BAQ Usage With A BPM
For Epicor ERP: Kinetic, V10, & v9
If you are like a lot of customers, you probably have a TON of BAQs that you are unsure if anyone is even using. Here is a quick trick you can use to start logging every time an Epicor BAQ is run (and by who) using a simple BPM.
First thing to note, when you run a BAQ in Epicor is is calling either DynamicQuery.Execute() or DynamicQuery.ExecuteByID(). Execute is run when you hit the analyze button in the BAQ designer whereas ExecuteByID is run most other places. And just like everything else within Epicor, these are regular BO calls can have BPMs attached. So start by going to System Management / Business Process Management / Method Directive Maintenance and use the ‘Method Code’ browse button to select DynamicQuery.Execute:

Now got to File / New / New Post-Processing to add a new directive to this BO method. Fill in a directive name, group, and hit the design button to start editing the BPM. Now if I were on an on-premise instance I would probably just use the custom code editor within here and that would be it, but given the number of multi-tenant customers out there I figured we would write these next steps up to be compatible. At a high level, here is what we are going to do:
We are going to use a UD table (UD01) to keep track of everything. There will be one row per BAQ and within that row we will record the last time it was run and by whom.
Because we cannot use the custom code editor we will use the ‘Execute BO Method’ widget to call UD01.UpdateExt. UpdateExt is a fantastic method because it automatically just figures out whether a row needs to be updated or inserted.
To feed that UpdateExt method we will be defining and filling a variable with an UpdateExt dataset.
Ok, so first things first let’s create that variable. To do so click one on the gray canvas area (just to make sure nothing else is selected) and in the lower portion of the window select the New button giving it a name of ‘NewUD01’ and and picking ‘Choose type’ for the type:

When the ‘Choose Type’ dialog pops up you are going to need to give it a little bit of time to fill out its full list (as you scroll down it keeps loading more). When it is done loading you want to expand Ice.Contracts.BO.UD01 and select Ice.Tablesets.UpdExtUD01Tableset (this is the UpdateExt tableset for UD01):

Now we are ready to fill this tableset. To do so, drag the ‘Fill Table By Query’ widget onto the canvas and attach it to the ‘Start’ node:

Now click on the newly added ‘Fill Table By Query’ widget and click the link where it says ‘designated’ to specify the query we are going to use to fill this tableset:

We are not actually going to use this query for all that much as we have most of the data points we already need for our logging. Just add the Company table to the canvas:

Then go to the Display Fields tab and add the Company1 field and click OK:

Now back on the main canvas with the ‘Fill Table By Query’ widget still selected, click the link where it says ‘specified’ table and pick NewUD01.UD01 and hit OK:

Now click the link for ‘specified’ mapping:

Within this dialog we can punch through anything from the query or BO execution properties into our UpdateExt tableset variable we defined earlier. Start with the Company row by hitting the drop-down in the Binding column and selecting ‘field: Company_Company1’:

Next hit the drop-down for Key1 and here we want to select ‘expr: specified expression’:

The expression editor is now presented. From the left hand variable browser double click on Parameters / queryDS / DynamicQuery / QueryID and hit OK:

Now to fill in the remaining fields - we are going to use the same expression editor for the rest of the columns. For Date01 we will use the ‘Today’ function:

And we will add the current user ID to ShortChar01 from the call context:

With all of our mappings in place we can close the ‘Setup Table Mapping’ window and return to the main canvas where we want to add and connect the ‘Invoke BO Method’ widget:

You will want to click on that newly added widget and first select the link to specify the BO method as UD01.UpdateExt:

Then use the specified parameters link to define how we pass our data in to this BO method.
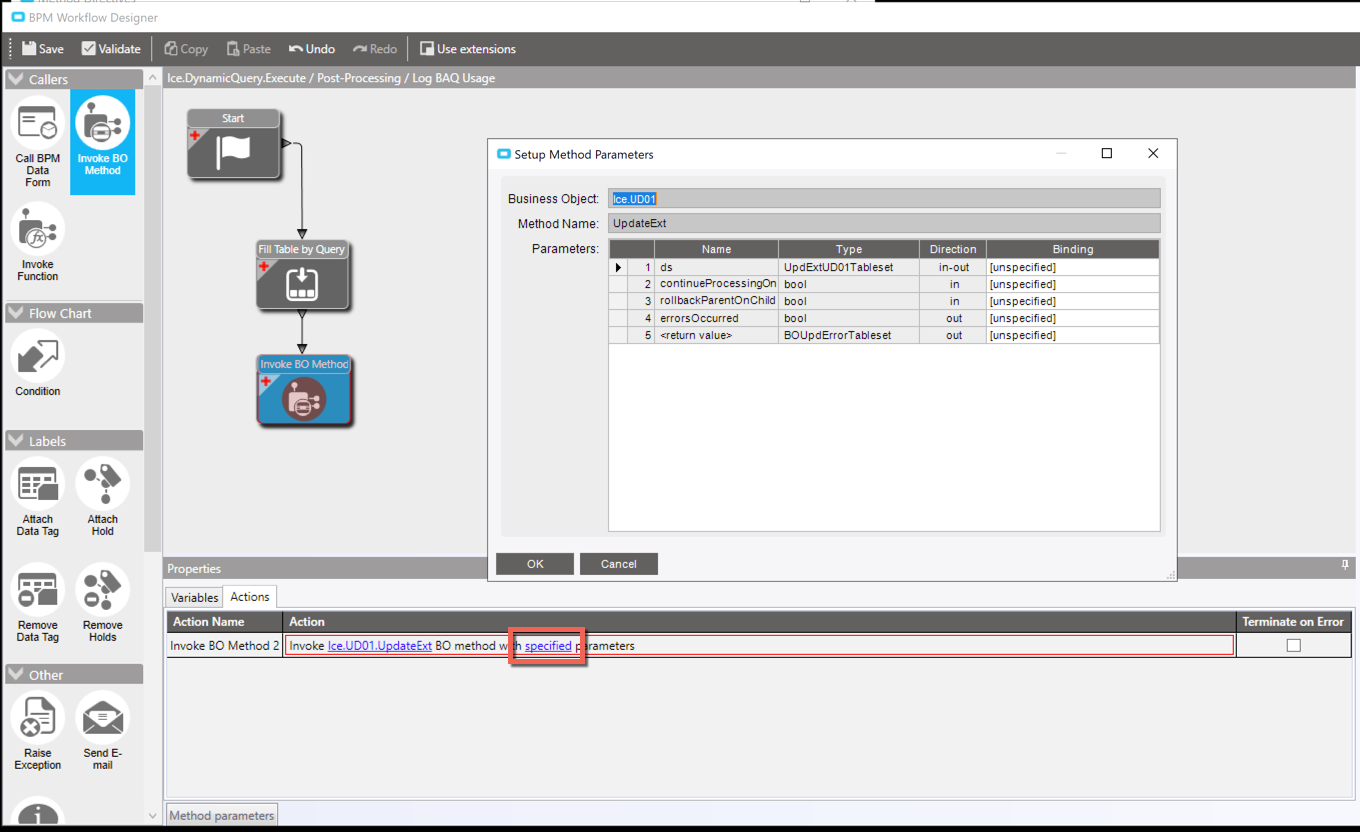
Here we are going to see this now-familiar binding column. What we want to select here is as follows:
ds: Use the drop-down to select ‘var NewUD01’ here. This is that UD01 UpdateExt tableset we have been filling.
continueProcessingOnError: Use the expression editor here to just hard-code the value false. We are only writing a single row here so this parameter will not ever come into play for us, but if you happened to be writing a bunch of rows this would be helpful in determining whether it should keep writing after the first failure or not.
rollbackParentOnChildError: Use the expression editor here to hard-code the value true. As with the previous, this won’t be impactful for this particular use case since we are both writing only a single row and there is no parent-child relationship at play - but setting this to true is a good best practice.
errorsOccurred: Use the drop-down here to select ‘create new varaible…’ and give it the name errorsOccurred. We are not going to do anything with this variable through the remainder of this article.
returnValue: Use the drop-down here to select ‘create new variable…’ and give it the name BOUpdErrorTableset. As with errorsOccured we are not going to use this variable through the rest of this article.
Ok, so at this point if you hit OK and enable this BPM you should be all set. Go run a BAQ using the BAQ designer and verify that it is indeed logging them (try it multiple times for a BAQ and also ensure that it is updating the row when it already exists). Assuming all is good you will now want to repeat all of these steps for DynamicQuery.ExecuteByID to catch those runs.
