
Epicor Customizations: Adding Your Own Actions Menu Entries
As developers of Epicor customizations, our aim should typically be to try to make our work look and feel like standard Epicor screens. Take, for example, an aspect of a customization I was doing for a customer where they had asked for a tool to copy price lists easily. While I could have certainly placed a button on the screen somewhere to fire off that logic, the “Epicor way” would be to place this functionality within an Actions menu like so:

So how do we go about doing this? You want to start by adding the following block of code within InitializeCustomCode:
string newButtonName = "CopyPriceList";
string newButtonCaption = "Copy Price List";
int newButtonIndex = 2;

ButtonTool btnCopyPriceList = new ButtonTool(newButtonName);
btnCopyPriceList.SharedProps.Caption = newButtonCaption;
if (!baseToolbarsManager.Tools.Exists(newButtonName)) {
    baseToolbarsManager.Tools.Add(btnCopyPriceList);
    PopupMenuTool actionsMenu = (PopupMenuTool)baseToolbarsManager.Tools["ActionsMenu"];
    actionsMenu.Tools.InsertTool(newButtonIndex, newButtonName);
}
The first 3 lines are all you need to edit should you reuse this snippet in your project. In the first line, we are giving this new menu entry a name - in our case “CopyPriceList.” Typical object naming rules here, no spaces or special characters, and make it something logical. Next, we define the label this menu entry shows up with, in our case, “Copy Price List.” Lastly, we have the new menu index - for this one, you want to look at the existing menu and determine the index of where you want your new menu entry to show up (starting your counting at 0). So for myself, I wanted my new entry to come right after ‘Export,’ which is at index 1, hence my selection of 2 for the new index. The menu entry currently at index 2 (Attachments) is bumped to position 3 when our new menu entry is added.
The remaining lines of code are going to be boilerplate, but you can see what they do - a new ButtonTool object is created, a caption is applied to it, a test runs to see if the button already exists and, if not, it is added and assigned to the Actions menu.
So now we have a button that doesn’t do anything. To wire it up you will want to add a form event for ToolClick using the wizard:

And then within that generated code block test for the condition that our menu entry was clicked:
private void baseToolbarsManager_ToolClick(object sender, ToolClickEventArgs args) {
    switch (args.Tool.Key)
    {
        case "CopyPriceList":
            MessageBox.Show("Your code goes here!");
            break;
        default:
            break;
    }
}
If you haven’t used this ToolClick form event handler before, note that ALL button/menu click events show up in here, and that is why we do a test on args.Tool.Key to make sure we are only looking for a specific button or menu item.
So one last bit to button this up - in many Epicor screens, you would see a menu action like this only be enabled if it were relevant. So in the example case here, I would only want to see the copy price list option be made available if I had a price list loaded up on the screen. The ‘Enabled’ shared property on ButtonTool can help us to accomplish this. To set this up first you will need to define that ButtonTool at the script level as opposed to within InitializeCustomCode:
public partial class Script
{
    ButtonTool btnCopyPriceList;
...
Now we make only a slight tweak to our InitializeCustomCode snippet such that we are not initializing the ButtonTool (the only change here is on the line where we define the new ButtonTool):
string newButtonName = "CopyPriceList";
string newButtonCaption = "Copy Price List";
int newButtonIndex = 2;

btnCopyPriceList = new ButtonTool(newButtonName);
btnCopyPriceList.SharedProps.Caption = newButtonCaption;
if (!baseToolbarsManager.Tools.Exists(newButtonName)) {
    baseToolbarsManager.Tools.Add(btnCopyPriceList);
    PopupMenuTool actionsMenu = (PopupMenuTool)baseToolbarsManager.Tools["ActionsMenu"];
    actionsMenu.Tools.InsertTool(newButtonIndex, newButtonName);
}
Now add an EpiViewNotification for the data that will drive whether this menu item should be enabled or disabled:
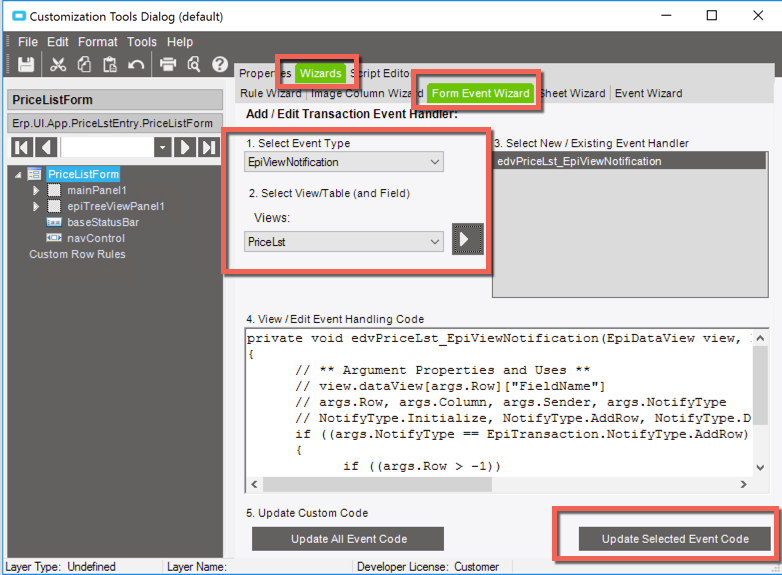
And then within that code stub Epicor puts in for us use that ‘Enabled’ shared property as you see fit - for me I am just enabling it so long as there is a PriceLst row present:
private void edvPriceLst_EpiViewNotification(EpiDataView view, EpiNotifyArgs args) {
  if (args.Row > -1) {
    btnCopyPriceList.SharedProps.Enabled = true;
  } else {
    btnCopyPriceList.SharedProps.Enabled = false;
  }
}
That’s it - hopefully this helps somebody out there!
