
Launching An Epicor 10 Screen With A Specific Customization From Code
Epicor gives us a variety of ways to launch forms from other forms via code. In this article, I spell out some of the more common Epicor programming scenarios to get this to work. Let’s get started!
Scenario #1: Loading via a menu entry
Loading via a menu entry is the easiest of all scenarios - all you are looking to do is load up a screen (i.e., Part Maintenance) that you may or may not have customized. The single line of code you need to do this is as simple as this:
ProcessCaller.LaunchForm(oTrans, "OMMT1112");
So for this line of code, you have two arguments - the first is the “sender” (i.e., what object that is calling this new form - conveniently just put oTrans in here every time) and the second argument is the menu maintenance ID you are calling.

And that’s it - whenever you run that line of code (whether invoked with a button or any other way), it launches that menu entry with whatever customization is defined in menu maintenance for it. No data is preloaded in this scenario, though - for that keep reading.
Scenario #2: Loading via a menu entry & pulling up some data
So let’s say you want to pull up a screen and also load up some data. Well, that is either going to be easy or a bit more complicated. The simple scenario is when you have a straightforward single key value to get you the record you need. Think a part number for part entry, a sales order number for sales order entry, etc. To accomplish this, all you need to do is pass a third argument to our LaunchForm line of code with the data we want to load up:
ProcessCaller.LaunchForm(oTrans, "OMMT1112", "PART1234");
So here we put the ID for the record we want to load (in this example, "PART1234”), and the form will not only load, but it also preloads with that specific record. That third argument can also be a LaunchFormOptions object which lets you not only define the record you want to load but also control how the launched screen works:
LaunchFormOptions lfo = new LaunchFormOptions();
lfo.IsModal = true;
lfo.ValueIn = "PART1234";
ProcessCaller.LaunchForm(oTrans, "OMMT1112", lfo);
So here we tell it the part ID to load (PART1234), but we also tell it that the form is modal - meaning it is the ONLY form that the user can interact with. So far so good, but what if you need to do something a little more fancy with the loaded form. Perhaps you want to update some screen controls (fill in a text box or something like that) that are not as easy as calling via ValueIn. That brings us to our final scenario, where we want to get access to the form object itself so we can do all sorts of crazy things:
Scenario #3: It is time to get bananas
So if you want to go down this path you are going to need to use Assembly Reference Manager to provide a reference to the UI DLL of whatever screen you intend on calling:
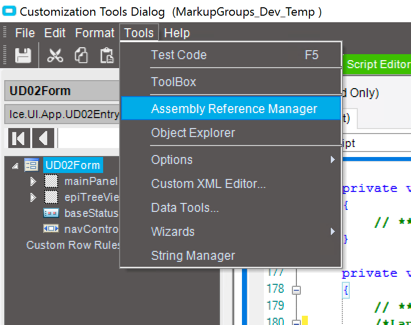
Access Assembly Reference Manager from the tools menu.

Click the button to Add Custom Reference.
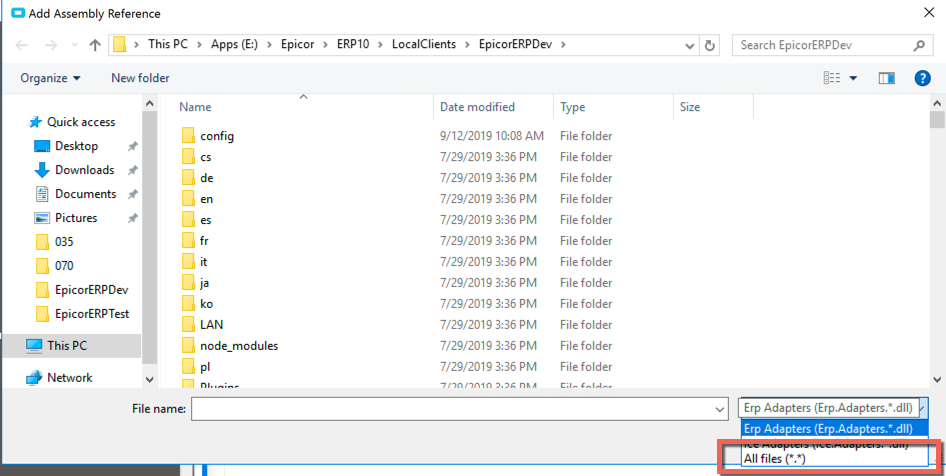
You will need to set the filter to show all files.

Pick the DLL you want to call - it should begin with Ice.UI or Erp.UI.
Now that you have the DLL referenced you can add the code:
// Define a reference to the transaction (oTrans) for the form you are calling.
Erp.UI.App.PartEntry.PartTransaction trans = new Erp.UI.App.PartEntry.PartTransaction(oTrans);

// Next define a reference to the form itself
Erp.UI.App.PartEntry.PartForm form = new Erp.UI.App.PartEntry.PartForm(trans);

// Define a search that loads up TEST1234 automatically when the form launches
SearchOptions opts = new SearchOptions(SearchMode.AutoSearch);
opts.PreLoadSearchFilter = "PartNum = 'TEST1234'";
opts.DataSetMode = DataSetMode.RowsDataSet;

// Actually execute the search.  This and all other oTrans methods are available
trans.InvokeSearch(opts);

// Tell it the specific customization name you want to load since we are not calling a menu entry
form.CustomizationName = "PartEntry_Prod_20191002";

// Show time
form.ShowDialog();
So we are starting here doing pretty much the same thing the prior scenarios were doing - calling up a form (in this case part entry) with a specific customization and then loading up “PART1234”. But obviously with a lot more code! But the cool thing about this scenario is that you have access now to (1) load up as many records as you like, (2) directly access objects on the form (i.e., fill in a text box with a default value) and (3) directly access all methods of the transaction (oTrans) of the launched form. For the scope of this article we are just going to focus on that first benefit - say you want to automatically load up all parts that start with “TEST12” - all you’ve got to do is update the PreLoadSearchFilter like so:
opts.PreLoadSearchFilter = "PartNum LIKE 'TEST12%'";
If none of these options solve your needs also check out our article on using environmental variables to pass data in between forms. Hope this article helps somebody out there!
