
Adding Custom Tables To A Screen In Epicor
One of my more frequently visited articles is on how you can add custom field to EpiDataViews and it occurred to me that perhaps some of you out there might be looking for ways to incorporate entirely custom Epicor database tables as well. The Epicor architecture allows us to define brand new EpiDataViews on a screen and then use them just like any other view. What’s more, you can even define parent / child relationships on these EpiDataViews that you create to build very complex screens.
Let’s start with the easiest scenario, adding one of the UD tables to your screen. This scenario is easy because Epicor gives us a wizard that writes all of the code for us. Before you start the wizard, though, you will want to think out how your tables are going to relate. Keep in mind that the UD tables have 5 key fields (key1, key2, key3, key4, and key5) - you don’t need to use all of them but the UD module will enforce uniqueness. So let’s say, for example, you want to add your own DIY “configurator” to order entry and you are going to do so by attaching a UD table to the line - your key map might look something like this:
OrderNum => Key1
OrderLine => Key2
Attribute ID => Key3
And from there you are going to store the attribute value into Number01. So the actual data in the UD table might be expected to look something like this:
| Key1 | Key2 | Key3 | ShortChar01 |
| 1000 | 1 | Color | Green |
| 1000 | 2 | Size | Big |
| 1001 | 1 | Color | Red |
| 1001 | 2 | Size | Small |
So, as mentioned, we are fortunate in that Epicor gives us a wizard to do all of the hard work her for us. To get to it simply go into customization mode and navigate to Tools / Wizards / Customization Wizards:
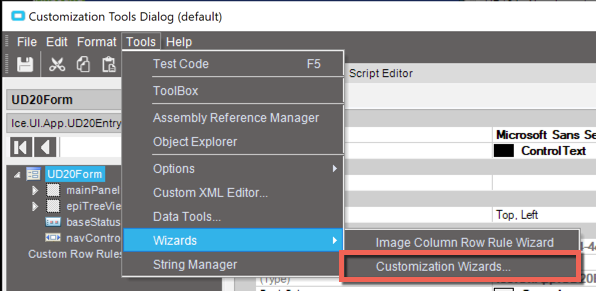
Next select the ‘Add User Defined Table As Child’ wizard and press ‘Launch Wizard’:

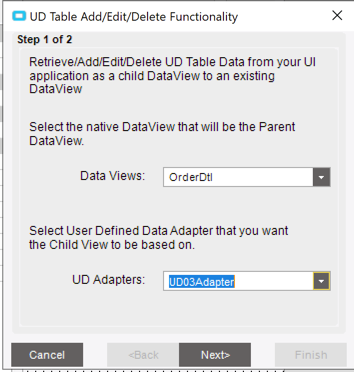
On the first step you need to specify which data view you are linking on and which UD adapter we wish to connect. Recall in this example we are linking at the line level (OrderDtl) for our DIY configurator and lets say we are storing our data in UD03:
Click next and now we will need to define how the fields in OrderDtl tie up to the selected UD table. To make these connections simply pick the value from the ‘Fields’ drop down for your source table (OrderDtl) and 'UD Key Fields’ for the destination table (UD03):


A careful observer here might notice that only keys 1-4 are available for selection. Another thing that this wizard does for us is configure key5 to be an automatic auto-incrementing number so entries are guaranteed to be unique (if you don’t like that behavior you can edit the resulting code of this wizard). Note here that we are only telling the wizard the values for key1 and key2 here - that is because there is a one-to-many relationship we are looking for (a given order line could have multiple attribute rows). Click finish and navigate to the script editor to see what has been written for you:

Thank goodness we didn’t have to write all of this!
You don’t really need to do anything with the code at this moment but we will need to save our customization, get out, and then back in before we can do much with it since so much of the work is done on initialization. But upon reloading this customization we will find that our newly bound UD table will show up like and other EpiDataView allowing us to bind it to widgets:
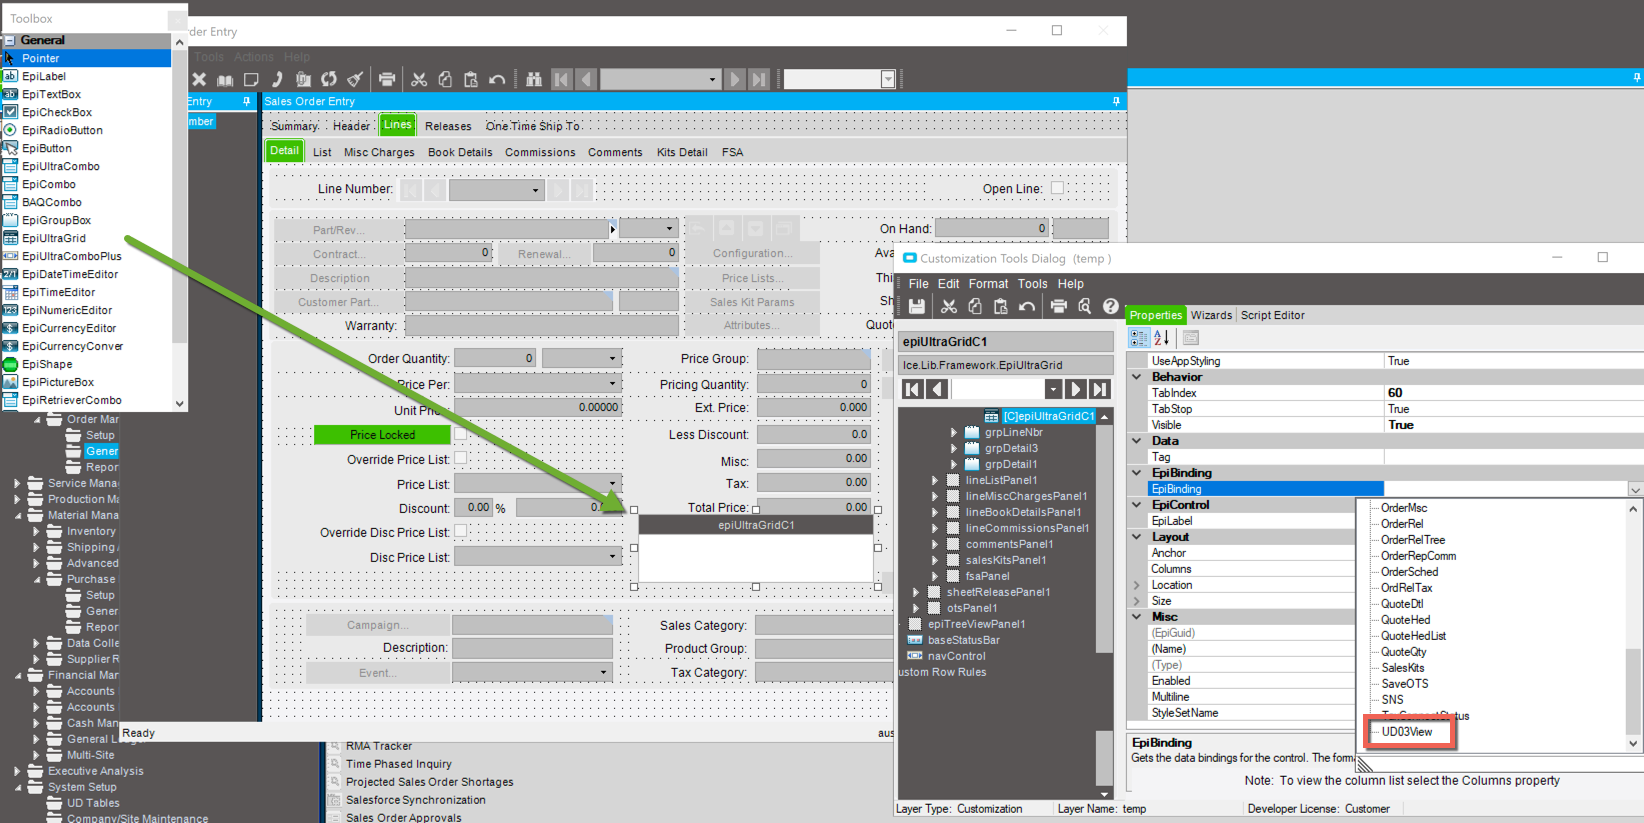
…or interact with it just like any other EpiDataView. Whats more, Epicor has even added for us a ‘New’ menu option to create new entries within this table:

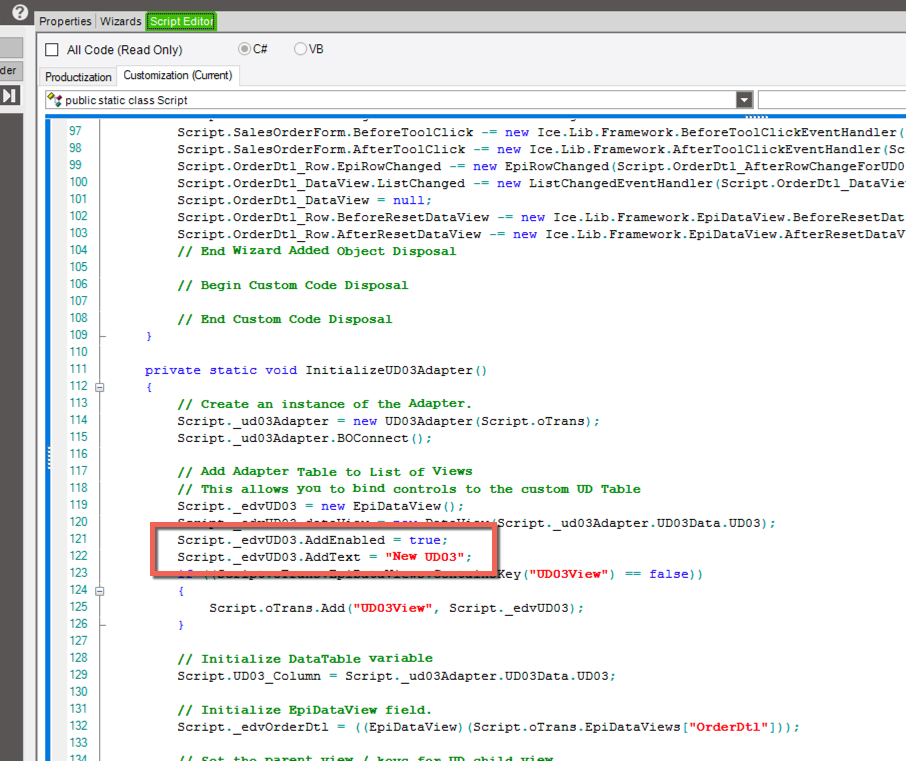
If you want to change the text of that menu entry, simply tweak it at line 122 of the code that was generated for you (or you can flip ‘Add Enabled’ to false if you don’t want the menu at all):
All pretty simple so far, right? Well how about if the table you want to add isn’t a UD table? Fortunately we can look to the auto-generated code here to learn how to create our own custom setup. I am not going to spell out every possible option here, but in general here are the steps:
Define your table, EpiDataView, and anything else you might need at the top of the script where Epicor has “// Add Custom Module Level Variables Here **”:
// I am going to pull my data from a BAQ, so reference the adapter
DynamicQueryAdapter dynamicQueryAdapter;

// Here is my table I need to define and fill
DataTable dtMyCoolTable;

// Here is the EpiDataView I will be creating
EpiDataView edvMyCoolDataView;
Within InitializeCustomCode() after the comment line “// Begin Wizard Added Custom Method Calls” build out your data table structure point the EpiDataView to it:
dtMyCoolTable = new DataTable();

// Adding a column for Customer and making it disabled for edit
dtMyCoolTable.Columns.Add("CustNum", typeof(int)).ExtendedProperties["Enabled"] = false;
// Adding another column for Selected, it is editable
dtMyCoolTable.Columns.Add("Selected", typeof(bool));

edvMyCoolDataView = new EpiDataView();
// Connect the EpiDataView to this new data table
edvMyCoolDataView.dataView = new DataView(dtMyCoolTable);
// Add the EpiDataView to oTrans to make it available
oTrans.Add("ShipmentNotifications", edvShipmentNotifications);
// If you want to tie this to another EpiDataView, use the below lines to define the relationship
string[] parentKeyFields = new string[1];
string[] childKeyFields = new string[1];
parentKeyFields[0] = "CustNum";
childKeyFields[0] = "CustNum";
edvMyCoolDataView.SetParentView(edvOrderHed, parentKeyFields, childKeyFields);
And thats it - from here you might go about filling the data table from a BAQ but it is ready at this point to bind to grids or interact with like you would any other EpiDataView. Hope this helps somebody out there looking at add Epicor database tables into a custom screen! Let us know in the comments below…
